Welcome to Mobile Disruptors!
We look forward to helping you grow your new business! This Getting Started Guide will walk you through the initial steps of launching your business.
MobileDisruptors encapsulates the platforms SocialOwl, ShoutHub, MobileStamp, BeaconEdge, TapPerks, PerkUp, SweepSurge, SavvyWifi and DealDrip. This guide will help you with the setup procedures for any or all of the platforms.
Please note: If you have purchased a bundle of licenses for all 9 platforms, you will only need to set up 7 total domains or subdomains, as SavvyWifi and DealDrip share a domain/subdomain, as well as TapPerks, and PerkUp.
Contacting Us
Now that you have purchased your license, all further contact should be done with help@mobiledisruptors.com.
Be sure to add us to your contacts to ensure that you receive our replies. That’s the number one reason for miscommunication when first signing up.
Five Easy Steps to Launch Your Business
- Purchase A Web Domain
- Make DNS Changes
- Send Us Your Domain
- Look for Email(s) From Us
- Create Your Custom Logo
Please note that the different platform(s) you purchased will have different settings. This guide should address common settings across all of our platforms, so we recommend reading through this guide in its entirety.
Step 1: Purchase a Web Domain
The first step in rolling out your new business is setting up your website! To do this, you’ll need to purchase a web domain. We recommend using BlueHost because they will give you a great discount! It’s also really easy to change the DNS settings, which saves you time. And they have inexpensive packages available to to obtain an email address with your domain. To get your discounted rate, click HERE.
The following instructions will be a step-by-step guide for setting up your website using BlueHost. If you purchased your domain elsewhere, you can skip to the section on General DNS Instructions. We highly recommend using BlueHost unless you have a solid understanding of how to set up DNS settings.
Search for a domain
- If you use the BlueHost link above, after you click “Get Started Now” and choose your plan, you’ll be directed to a domain search tool.
- Enter your desired website name in the “Create a new domain” box and hit the blue “Next” button. BlueHost will show you if the domain is available. If not, you will see similar variations to choose from.
- Review the search results. If your first choice is available, a green box will appear at the top of the page. Otherwise, review similar options or try a new name.
Set up your account
- Once you find an available domain and the green box pops up, create an account by filling in all of the fields underneath the green box: Account information, package information, and payment information.
- Once your payment is processed, you’ll see the “Congratulations” screen with your order details. You now have a domain!
Note: For license bundles/multiple platforms, BlueHost makes it quick and simple to purchase just one domain and create subdomains for each platform. Alternatively, you may decide you want to purchase separate domains for each platform or to set up subdomains from a pre-existing domain and website. This guide will help with all three scenarios.
Step 2: Make DNS Changes
Navigate to domain settings
- From the “Congratulations” screen, click on the “Go to Control Panel” button on the right hand side. You’ll be prompted to set up an account password. Keep your domain and password handy so you can easily access your control panel!
- Once you set up a password, the screen will say “Your account is ready to go. Now you can login!” Follow the instructions and log in to your account using the domain and password you just established.
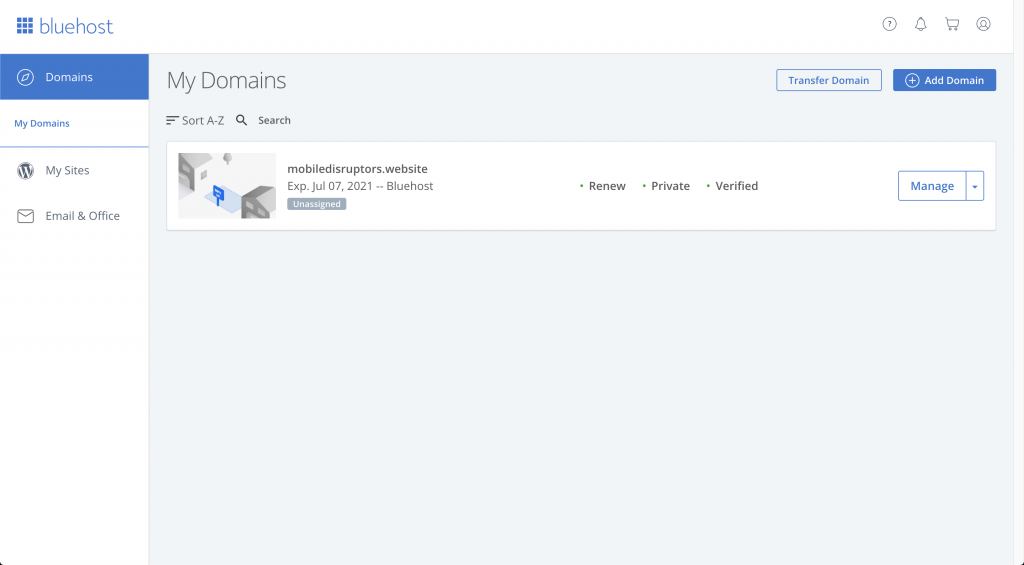
- When the “Welcome to BlueHost!” screen pops up, click the blue “View my domain” button. You should see a dashboard screen that looks like this:
- When you click on the “Domains” tab in the left-hand menu, you may see a message saying “Domain propagating please wait…” This is normal—it just means your domain is being created, which takes time!
- Once your domain is ready, you will see a “Manage” button appear on the left.
- Select “DNS” from the drop-down menu. You'll see a screen like this:
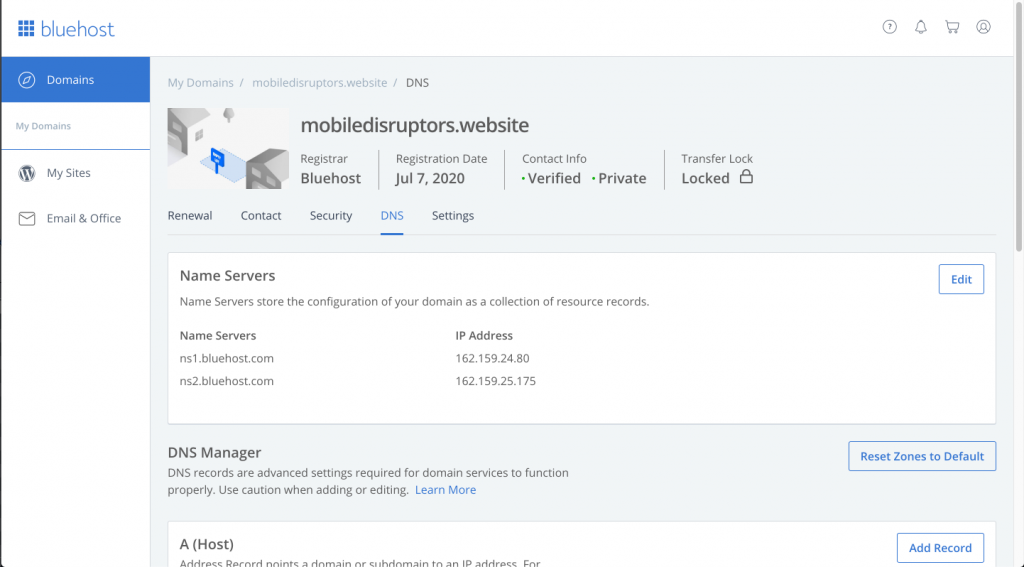
Make changes
First you will need to edit your main "A" record, which will allow the domain you purchased from BlueHost to talk to our servers.
SocialOwl
The SocialOwl records are slightly different than all the rest, so if you purchased only this license, read this section carefully. We need to add three new records using these steps:
- From the screen above, click the "Add Record" button to the right of A(Host).
- Under "Host Record," type the @ symbol.
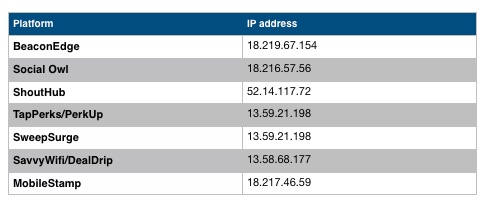
- Fill the "Points to" box with the IP address that corresponds with SocialOwl (See Table 1 below).
- Set the TTL drop-down box to 4 Hours (min).
- Click the blue "Save" button.
Repeat steps 1-5 two more times, but on the second time type "www" into the "Host Record" box, and on the third time type "banner" into the "Host Record" box. Keep the "Points to" IP address and TTL boxes the same. Once finished, you should have records like this:

All other platforms
Most of the instructions for the other platforms are similar to those of SocialOwl, but slightly simplified. You will only need to make two records for the other platforms, rather than the three we made in SocialOwl.
- From the domain screen (above), click the "Add Record" button to the right of A(Host).
- Under "Host Record," type the @ symbol.
- Fill the "Points to" box with the IP address that corresponds with your platform (See Table 1 below).
- Set the TTL drop-down box to 4 Hours (min).
- Click the blue "Save" button.
- Repeat steps 1-5, but this time change type "www" into the "Host Record" box.
Double-check your work: For SocialOwl, you should have three records on your dashboard: @, www, and banner, that all point to the SocialOwl IP address.
For all other platforms, you should have two records on your dashboard: @ and www, that point to the IP address corresponding to your platform from Table 1.
Setting Up Subdomains (Optional)
If you are setting up multiple platforms for your business, you may decide to create subdomains rather than purchase individual domains for each platform. This section will walk you through how to set up subdomains. If you are only using one platform, you can skip this step. Additionally, if you choose to purchase individual domains for each platform, you will simply repeat Steps 1 & 2 for each domain, then skip to Step 3. If you have a pre-existing website and domain that you would like to use, or have purchased a single domain and would like to use it across multiple platforms, please read through this section.
Setting up a subdomain is very similar to the steps we went through above.
- From the domain screen (above), click the "Add Record" button to the right of A(Host).
- Under "Host Record," type what you want your subdomain to be. For example, if your domain was awesomemarketing.com, you could create a subdomain of social.awesomemarketing.com by inputting “social” under “Host Record.”
- Make sure to fill the "Points to" box with the IP value from Table 1 that corresponds with the platform for which you are creating this subdomain.
- Set the TTL drop-down box to 4 Hours (min).
- Click the blue "Save" button.
When you return to the main screen, you should now see a new record with your designated subdomain. (If you don't see it, you may have forgotten to click the "Save" button. Just go through the steps again and make sure to save your work!)
Note: SocialOwl is the only platform that is a bit different when it comes to subdomains. If you decide to use SocialOwl on a subdomain, you will need to add an additional A record called "banner" that points to the IP value 18.216.57.56 (similar to what we did with the regular domain records). This record is necessary for the content banner feature of the SocialOwl platform. If the banner record isn't created, then that feature won't function properly.
You can create subdomains for each platform you have licensed by repeating the steps in this section and inputting the different IP addresses for each platform (see Table 1). Remember that TapPerks & PerkUp share a single website, as do DealDrip & SavvyWifi, so even if you are doing setups for all 9 platforms, you should only have 7 subdomains total.
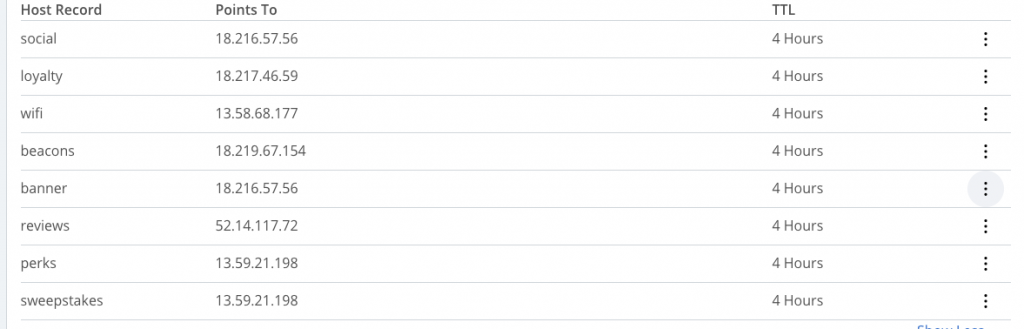
Here's an example of a setup with subdomains for each platform:
If you have any trouble creating subdomains, please send an email to help@mobiledisruptors.com and we will be glad to assist you.
General DNS Instructions
Even if you did not purchase your domain from BlueHost, the set up may be similar depending on your domain provider.
The most important thing is that there needs to be two “A” type records: one that points the main domain to our IP address (From Table 1), and a second one that points all the subdomains to the same IP address. The only one that is different is SocialOwl. For that, you need to make sure to add in a record for "banner." For example, it should look similar to this if it's on SocialOwl:
Other platforms will look something like this, using the corresponding IP address associated with your platform (From Table 1) :

Usually, you will find a section in your domain settings for “Advanced DNS Zone File” or something in that regard. But again, it’s different for every provider.
If you would like assistance in setting up your domain with your domain provider, you can email your domain credentials along with your domain to help@mobiledisruptors.com and we will be glad to make the changes on your behalf.
Step 3: Email Us Your Domain
Once your domain changes have been made, email your domain to help@mobiledisruptors.com
Additionally, if you would like assistance in setting up your domain or if you have a different domain provider, you can email your domain credentials to help@mobiledisruptors.com and we will be glad to make the changes on your behalf.
If you have multiple licenses, be sure to identify which domain goes with which platform.
Step 4: We Will Email You Back
Once we receive your domain, we will get it set up and send you two separate emails within 48 hours. One will contain your credentials and the second one will be a reply to your original email with additional instructions.
If you don’t hear from us, as mentioned before, be sure to add help@mobiledisruptors.com to your contacts and check your spam email box.
Step 5: Create Your Custom Logo (Optional)
Now that you have a website, you'll likely want an eye-catching logo for your business. We have a great resource to help you create something unique and personalized!
The Logo Company custom designs logos to meet individual business needs. You'll be put in the hands of a design team that can help create a logo you love, with unlimited redraws and revisions available at an affordable rate. If you use this link here to sign up, you'll get a special discounted rate.